2017년 7월 2일 일요일

책 리뷰, 글로벌 소프트웨어를 꿈꾸다


글로벌 소프트웨어를 꿈꾸다
글로벌 소프트웨어를 꿈꾸다
이 책은 실리콘밸리의 소프트웨어 회사와 국내 소프트웨어 회사의 차이점이 무엇인지 살펴보고, 그 차이점을 일으키는 것이 무엇인가에 대하여 이야기 하고 있다. 저자는 그것이 지식과 기술보다는 바로 '개발문화, 기업문화'에 있다고 말한다. 이 책에서는 세계 수준에 근접한 기술과 기법은 그에 걸맞은 균형 잡힌 사고와 문화 수준이 어우러질 때 극대화될 수 있다는 것을 극명하게 보여주고 있다. 따라서 이 책에서는 우리나라의 소프트웨어 회사가 어떻게 소프트웨어 회사로 성장할 수 있을 것인지 그 필요한 사항들을 세심히 짚어준다. 이 책은 특히...


"글로벌 소프트웨어를 말하다. 지혜" 편과 시리즈는 아니지만 그전에 나온 책입니다.
소프트웨어 회사에서 개발문화, 기업문화가 중요하다는 이야기, 개발자들도 어떤 방식으로 일을 해야하는가에 대해 접근합니다. 개발문화는 어떻게 생각하고 만들어가야하는가에 대한 생각을 정리할때 좋은 책입니다.

개인적인 감상은 조금 답답한 책이었습니다.
그 답답함의 이유는 책이 답답하다는 것이 아닌 상황을 바꾸기 힘든 요소들을 어떻게 고쳐나갈 것인가,
어떻게 좋은 개발문화, 기업문화를 만들 것 인가에 대한 답답함이었습니다.
정론을 말해주고 있지만 그 정론에 도달하기위해서는 많은 노력이 필요하고 끊임없이 닦아내야 할 것을 알기 때문일지도 모르겠습니다.

두고두고 보면서 개발문화의 방향을 생각해볼 수 있는 책입니다.

2017년 7월 1일 토요일

책 리뷰, 글로벌 소프트웨어를 말하다.

글로벌 소프트웨어를 말하다, 지혜
글로벌 소프트웨어를 말하다, 지혜
기후와 토양에 따라 귤이 되기도 하고, 탱자가 되기도 하듯이 지혜에 따라 글로벌 소프트웨어가 되기도 하고, 국내 소프트웨어로 머물기도 한다. 소프트웨어에 대한 근본적인 이해, 통찰력, 그것이 바로 지혜다. 국내를 넘어선, 글로벌 소프트웨어를 향한 지혜의 세계로 여러분을 안내한다.


주 내용
이 책은 제목에서 말하듯이 글로벌 소프트웨어를 만들고자 한다면 어떤 생각을 가지고
어떻게 개발해나가야 하는가에 대해 이야기한다.
우리나라에서 개발환경과 실리콘밸리에서의 개발환경의 차이점을 이야기하면서
우리나라에서 개발하기 힘든점 등을 이야기하고 이를 극복하기위해서 이렇게 해야한다 라는
방향성을 말하고 있다.

개인적으로는 이 책에서 하는 말이 다 맞는 말이라는 걸 알면서도 고치기 힘들어서 다시 그 길을 걸어가는게 어쩔 수 없다는 생각을 했다.
예를 들면 작은 소프트웨어들을 만드는 작은 회사에서 제품상세문서, 이슈 트래킹, 코드 리뷰 등을 다 할 수 없는 것 같지만 이 부분도 필자는 알고 있는 것 같다.
(하지만 이 문제는 글로벌 소프트웨어를 만들고 싶다면 꼭 해야한다는 점을 공감한다.)

개발자가 어떻게 생각하고 개발해야하는가 할 때 읽어보면 좋은 책이다.
개발 프로세스를 어떻게 잡아야하는지에 대한 자세한 내용은 없지만 어떤 방향으로,
어떻게 생각해서 개발해야한다는 알 수 있는 책이다.

2017년 6월 20일 화요일

개인적인 Gradle 공부


요즘 Gradle을 많이 보고 다룰 일이 생겨서 개인적으로 공부해보기로 했습니다.

Gradle, 그래들이라고 불리는 이건 뭘까요?
위키에는 뭐라고 써있는지 보겠습니다.
Gradle은 Groovy를 이용한 빌드 시스템이다. Groovy와 유사한 도메인 언어를 채용하였으며, 현재 안드로이드 앱을 만드는데 필요한 안드로이드 스튜디오의 공식 빌드 시스템이기도 하다. Java, C/C++, Python 등과 같은 여러 가지 언어를 지원한다.
한국 위키는 설명이 좀 부실하네요. 영문 위키가 더 자세히 잘 설명되어있습니다.
https://en.wikipedia.org/wiki/Gradle

그래들이 그루비를 이용한 빌드 시스템이라고 하는데 그럼 그루비는?
https://ko.wikipedia.org/wiki/%EA%B7%B8%EB%A3%A8%EB%B9%84

설명이 꽤나 길군요. 요약해보자면,
자바에 파이썬, 루비, 스몰토크 등의 특징을 더한 
동적 객체 지향 프로그래밍 언어

그래들은 이러한 특징을 가진 그루비를 기반으로 하는 언어를 사용한다고 합니다.
그리고 자바뿐만 아니라 다른 언어를 빌드하는데에도 많이 사용된다고 합니다만,
저는 안드로이드 빌드 때문에 Gradle을 공부하고 싶기때문에
안드로이드 빌드를 중심으로 보겠습니다.

제가 참고한 곳은 안드로이드 개발자 홈페이지 입니다.
https://developer.android.com/studio/build/index.html#detailed-build

빌드의 일반적인 흐름은 다음과 같습니다.


그래들은 이런 빌드 과정을 설정하고 자동화할 수 있도록 해줍니다.
종속성을 어떻게 관리할 것인지, 빌드를 하고 나서 어떻게 처리를 할 것인지,
배포 빌드, 테스트 빌드 등 설정을 할 수가 있습니다.

빌드 구성 파일의 구조는 아래와 같습니다.


제일 위에 있는 build.gradle은 프로젝트의 모든 모듈의 빌드 세팅을 정의합니다.

/**
 * The buildscript {} block is where you configure the repositories and
 * dependencies for Gradle itself--meaning, you should not include dependencies
 * for your modules here. For example, this block includes the Android plugin for
 * Gradle as a dependency because it provides the additional instructions Gradle
 * needs to build Android app modules.
 */

buildscript {

    /**
     * The repositories {} block configures the repositories Gradle uses to
     * search or download the dependencies. Gradle pre-configures support for remote
     * repositories such as JCenter, Maven Central, and Ivy. You can also use local
     * repositories or define your own remote repositories. The code below defines
     * JCenter as the repository Gradle should use to look for its dependencies.
     */

    repositories {
        jcenter()
    }

    /**
     * The dependencies {} block configures the dependencies Gradle needs to use
     * to build your project. The following line adds Android Plugin for Gradle
     * version 2.3.2 as a classpath dependency.
     */

    dependencies {
        classpath 'com.android.tools.build:gradle:2.3.2'
    }
}
/**
 * The allprojects {} block is where you configure the repositories and
 * dependencies used by all modules in your project, such as third-party plugins
 * or libraries. Dependencies that are not required by all the modules in the
 * project should be configured in module-level build.gradle files. For new
 * projects, Android Studio configures JCenter as the default repository, but it
 * does not configure any dependencies.
 */

allprojects {
   repositories {
       jcenter()
   }
}
최상위 build.gradle은 프로젝트의 모든 모듈에 공통되는 gradle 저장소와 종속성을 정의하기 위해 buildscript {} 블록을 사용합니다.

모듈 레벨 빌드파일도 한번 보겠습니다. 보통의 안드로이드 앱 프로젝트라면,
project/app/build.gradle 파일을 말합니다.

/**
 * The first line in the build configuration applies the Android plugin for
 * Gradle to this build and makes the android {} block available to specify
 * Android-specific build options.
 */

apply plugin: 'com.android.application'
/**
 * The android {} block is where you configure all your Android-specific
 * build options.
 */

android {

  /**
   * compileSdkVersion specifies the Android API level Gradle should use to
   * compile your app. This means your app can use the API features included in
   * this API level and lower.
   *
   * buildToolsVersion specifies the version of the SDK build tools, command-line
   * utilities, and compiler that Gradle should use to build your app. You need to
   * download the build tools using the SDK Manager.
   */

  compileSdkVersion 25
  buildToolsVersion "25.0.3"

  /**
   * The defaultConfig {} block encapsulates default settings and entries for all
   * build variants, and can override some attributes in main/AndroidManifest.xml
   * dynamically from the build system. You can configure product flavors to override
   * these values for different versions of your app.
   */

  defaultConfig {

    /**
     * applicationId uniquely identifies the package for publishing.
     * However, your source code should still reference the package name
     * defined by the package attribute in the main/AndroidManifest.xml file.
     */

    applicationId 'com.example.myapp'

    // Defines the minimum API level required to run the app.
    minSdkVersion 15

    // Specifies the API level used to test the app.
    targetSdkVersion 25

    // Defines the version number of your app.
    versionCode 1

    // Defines a user-friendly version name for your app.
    versionName "1.0"
  }

  /**
   * The buildTypes {} block is where you can configure multiple build types.
   * By default, the build system defines two build types: debug and release. The
   * debug build type is not explicitly shown in the default build configuration,
   * but it includes debugging tools and is signed with the debug key. The release
   * build type applies Proguard settings and is not signed by default.
   */

  buildTypes {

    /**
     * By default, Android Studio configures the release build type to enable code
     * shrinking, using minifyEnabled, and specifies the Proguard settings file.
     */

    release {
        minifyEnabled true // Enables code shrinking for the release build type.
        proguardFiles getDefaultProguardFile('proguard-android.txt'), 'proguard-rules.pro'
    }
  }

  /**
   * The productFlavors {} block is where you can configure multiple product
   * flavors. This allows you to create different versions of your app that can
   * override defaultConfig {} with their own settings. Product flavors are
   * optional, and the build system does not create them by default. This example
   * creates a free and paid product flavor. Each product flavor then specifies
   * its own application ID, so that they can exist on the Google Play Store, or
   * an Android device, simultaneously.
   */

  productFlavors {
    free {
      applicationId 'com.example.myapp.free'
    }

    paid {
      applicationId 'com.example.myapp.paid'
    }
  }

  /**
   * The splits {} block is where you can configure different APK builds that
   * each contain only code and resources for a supported screen density or
   * ABI. You'll also need to configure your build so that each APK has a
   * different versionCode.
   */

  splits {
    // Screen density split settings
    density {

      // Enable or disable the density split mechanism
      enable false

      // Exclude these densities from splits
      exclude "ldpi", "tvdpi", "xxxhdpi", "400dpi", "560dpi"
    }
  }
}
/**
 * The dependencies {} block in the module-level build configuration file
 * only specifies dependencies required to build the module itself.
 */

dependencies {
    compile project(":lib")
    compile 'com.android.support:appcompat-v7:25.3.1'
    compile fileTree(dir: 'libs', include: ['*.jar'])
}

제가 보통 보는 블록은 defaultConfig, buildType, dependencies 정도인 것 같네요.
splits나 productFlavors를 잘 사용하면 무료, 유료 앱 따로 빌드하기나 
화면 해상도에 따른 빌드 설정을 각각해줄 수 있을 것 같네요.

그리고 추가적으로, 빌드할 때 필요한 설정을 가지고 있는 파일들이 있습니다.
- gradle.properties: 프로젝트 범위의 그래들 설정을 함. 예, gradle daemon 힙 크기 설정
- local.properties: 빌드 시스템의 로컬 환경을 구성. 예, sdk, ndk 경로 설정

뭔가 간단한 앱을 만들때는 build.gradle 파일을 많이 수정할 일이 없었는데
모듈을 만들어서 붙이고, 다른 플러그인도 같이 사용하게되면
종속성이나 여러가지 신경써야할 포인트가 많은 것 같습니다.

이 포스트를 시작으로 책도 좀 보고 더 깊게 공부해봐야겠습니다.

Gradle의 GitHub 주소를 남기고 글 마치겠습니다.

Google Analytics Update!

https://analytics.googleblog.com/2017/04/effortless-analytics-new-google.html


2017년 5월 20일 토요일

OpenGL ES 버전 2.0과 3.0 차이(1)


Cocos2d-x 버전 차이에 대해서 공부하던 중에 그 기반이 되는 OpenGL ES의 버전에도
큰 차이가 있지 않을까하여 공부해봤습니다.

우선 OpenGL ES란, (Wikipedia-ko)
OpenGL ES (임베디드 단말을 위한 OpenGL)는 크로노스 그룹이 정의한 3차원 컴퓨터 그래픽스 API인 OpenGL의 서브셋으로, 휴대전화, PDA 등과 같은 임베디드 단말을 위한 API이다.
한글로 작성된 위키는 짧군요.
영어로 작성된 위키를 더 보겠습니다. (Wikipedia-en)


OpenGL for Embedded Systems (OpenGL ES or GLES) is a subset[2] of the OpenGL computer graphics rendering application programming interface (API) for rendering 2D and 3D computer graphics such as those used by video games, typically hardware-accelerated using a graphics processing unit (GPU). It is designed for embedded systems like smartphonescomputer tabletsvideo game consoles and PDAs. OpenGL ES is the "most widely deployed 3D graphics API in history".[3]The API is cross-language and multi-platform. The libraries GLUT and GLU are not available for OpenGL ES. OpenGL ES is managed by the non-profit technology consortium Khronos GroupVulkan, a next-generation API from Khronos, is made for simpler high performance drivers for mobile and desktop devices.[4]

설명에 큰 차이는 없지만, API에 대한 설명에는 크로스 랭귀지, 멀티 플랫폼이 들어가있습니다.
OpenGL에서 사용할 수 있는 GLUT, GLU는 OpenGL ES에서는 사용할 수 없다. 정도네요.

각 버전별 설명도 잘 나와있는 영문 위키를 보면,

OpenGL ES 2.0
OpenGL ES 2.0 was publicly released in March 2007.[6] It is based roughly on OpenGL 2.0, but it eliminates most of the fixed-function rendering pipeline in favor of a programmable one in a move similar to transition from OpenGL 3.0 to 3.1.[7] Control flow in shaders is generally limited to forward branching and to loops where the maximum number of iterations can easily be determined at compile time.[8] Almost all rendering features of the transform and lighting stage, such as the specification of materials and light parameters formerly specified by the fixed-function API, are replaced by shaders written by the graphics programmer. As a result, OpenGL ES 2.0 is not backward compatible with OpenGL ES 1.1. Some incompatibilities between the desktop version of OpenGL and OpenGL ES 2.0 persisted until OpenGL 4.1, which added the GL_ARB_ES2_compatibility extension.[9]

OpenGL ES 3.0
The OpenGL ES 3.0 specification[10] was publicly released in August 2012.[11] OpenGL ES 3.0 is backwards compatible with OpenGL ES 2.0, enabling applications to incrementally add new visual features to applications. OpenGL 4.3 provides full compatibility with OpenGL ES 3.0. Version 3.0 is also base of WebGL 2.0.[12]
New functionality in the OpenGL ES 3.0 specification includes:

(참고, http://www.informit.com/articles/article.aspx?p=2181697&seqNum=2)

음, 각각 살펴보고 정리해보겠습니다.

OpenGL ES 2.0을 먼저 살펴보면,
2007년 3월에 출시되었습니다. OpenGL 2.0을 기반으로 하지만 OpenGL 3.0에서 3.1로 업데이트 될 때와 비슷하게 고정 렌더링 파이프라인을 제거하였습니다. 셰이더의 제어 흐름은 컴파일할 때에 쉽게 결정할 수 있는 순방향 분기, 루프로 제한됩니다.
이전에 고정 함수 API에 의해 지정된 재질 및 조명 매개 변수와 같은 변형 및 조명 스테이지의 거의 모든 렌더링 기능은 그래픽 프로그래머가 작성한 쉐이더로 대체되었습니다. 따라서 OpenGL ES 2.0은 OpenGL ES 1.1과 호환되지 않습니다. OpenGL과 OpenGL ES 2.0 데스크톱 버전 간의 일부 비 호환성은 GL_ARB_ES2_compatibility 확장을 추가 한 OpenGL 4.1까지 지속됩니다.

OpenGL ES 3.0은 어떨까요.
OpenGL ES 3.0 사양은 2012년 8월에 공개되었습니다. OpenGL ES 3.0은 OpenGL ES 2.0과 하위 호환되므로 응용 프로그램이 응용 프로그램에 점진적으로 새로운 시각적 기능을 추가할 수 있습니다.
OpenGL 4.3은 OpenGL ES 3.0과 완벽한 호환성을 제공합니다.
버전 3.0은 WebGL 2.0의 기반이기도합니다.
새로운 기능은 아래와 같습니다.
  • 오클루전 쿼리, 변환 피드백, 인스턴스 렌더링 및 4개 이상의 렌더링 대상에 대한 지원을 비롯하여 고급 시각 효과를 가속화 할 수 있도록 렌더링 파이프 라인에 대한 여러 가지 향상된 기능을 제공합니다.
  • 고품질 ETC2/EAC 텍스처 압축을 표준 기능으로 지원하여 각 플랫폼에 다른 텍스처 세트가 필요하지 않습니다.
  • 부동 소수점 텍스처, 3D 텍스처, 깊이 텍스처, 정점 텍스처, NPOT 텍스처, R/RG 텍스처, 불변 텍스처, 2D 배열 텍스처, 스위즐, LOD 및 밉 레벨 클램프, 매끄러운 큐브 맵 및 샘플러 객체에 대한 보장된 지원을 포함하여 크게 향상된 텍스처링 기능을 포함합니다.
  • 명시적으로 크기가 필요한 텍스처 및 렌더링 버퍼 형식의 광범위한 세트로, 구현 변동성을 줄이고 모바일 앱을 훨씬 쉽게 개발할 수 있습니다.
구글 번역기의 도움을 받아 해석해봤는데, 전반적으로 기능, 성능향상이 있어보입니다.
퍼포먼스 테스트 자료가 있으면 좋겠는데.. 없네요. 한번 테스트를 해봐야겠습니다.

OpenGL ES 버전 차이가 어떤가에 대해 개괄적인 내용이었지만
렌더링 방식, 텍스처 처리방식, 버퍼 크기등에 대한 차이가 있었네요.
다음 글에서는 성능 차이에 대한 이야기를 해보겠습니다.

2017년 5월 14일 일요일

Cocos2d-x version difference between 2.x vs 3.x

http://cocos2d-x.org/

Cocos2d-x는 현재 두개의 버전을 지원하고있는데요.
2.2.6 버전과 3.15 버전을 지원하고 있습니다.

최근에 이 두개의 버전은 어떤 차이가 있고, 성능차이가 있는가에 대해 궁금해져서
이렇게 포스팅을 하게 되었습니다.

우선 크게 바뀐 것 부터 정리해보자면,
Release Note on GitHub: Cocos2d-x-v3.0-ReleaseNote.md
참고: VallistA님의 블로그

1. Python을 사용한 크로스 플랫폼 개발 지원(Cocos console)
Cocos2d-x 2.x 버전에서는 Cygwin을 이용한 리눅스 환경에서 작업을 했다면,
3.x 버전에서는 파이썬을 이용한 cocos console을 이용해서 작업할 수 있게 되었습니다.
이를 통해 쉽게 크로스 플랫폼 환경에서 편하게 프로젝트를 만들고 컴파일할 수 있게 되었습니다.

2. Objective-C 패턴 제거(Objective-C pattern removed)

  1. cocos2d라는 namespace를 사용하게 되면서, 더이상 CC라는 prefix를 사용할 필요가 없게되었습니다.
    • CCSprite -> Sprite, CCFrame -> Frame, CCScene -> Scene, CCDirector -> Director 등으로 변경되었습니다.
  2. copy() 함수 대신에 clone() 함수를 사용합니다.
  3. Singleton은 getInstance(), destoryInstance() 함수명을 사용하여 인스턴스를 관리합니다.
    • 그전에는 sharedDirector()와 같은 함수를 사용했었습니다.
  4. Object 클래스 -> Ref로 변경
    • Object라는 이름이 모호한 점이 있어 Ref로 변경되었습니다.
  5. Getter 함수들이 get prefix를 가집니다.
  6. POD type의 변수를 const로 전달합니다.


3. C++11 features를 따름
C++ 11 버전을 지원하게 되어서 여러가지 기능을 사용 가능하고, 따르게 되었습니다.
- auto 키워드를 사용가능 (보다 적극적으로 사용하게 되었습니다.)
- lambda식을 사용가능.
- enum(strongly typed enum)을 사용.
        (CCPointZero -> Point::ZERO 로 변경)
- override, final 키워드를 사용.

4. 새로운 Renderer
Cocos2d-x 2.2버전은 현재 문제는 없지만 최적화를 하거나 새로운 함수 추가,
새로운 플랫폼 추가하기가 힘듭니다. 이런 문제를 해결하기 위해 새로운 렌더러를 만들었습니다.
새로운 렌더러는 다음과 같은 기능을 가집니다.
  • It has been decoupled from the Scene Graph. The draw() method, instead of "drawing" it sends a RenderCommand to the Renderer, and Renderer is responsible for drawing the queued RenderCommand commands.
  • QuadCommands (used by Sprite and ParticleSystem objects) will be automatically batched.
  • CustomCommand objects allow the user to use custom OpenGL code, using a API similar to v2.2
  • GroupCommand objects allow to have "stacks" in the Renderer with different OpenGL values.
  • Auto-culling for Sprite objects (although, technically, Auto-culling is not performed in Renderer code, but in the Sprite code)
  • Global Z ordering (local Z ordering is still supported)
좀 더 살펴보면,

- Auto-batching
batch 작업을 많이하면 할 수록 성능이 안좋아지는데 이를 최적화합니다.
- Auto-culling(view frustum culling)
Sprite에 대해 처리를 하는 작업입니다. Sprite가 화면에서 나갈경우 draw가 실행되지 않도록합니다.
- Global Z order
setZOrder(), getZOrder()을 deprecate하고
setGlobalZOrder(), getGlobalZOrder(), setLocalZOrder(), getLocalZOrder()을 만들었습니다.
화면 전체에 대해 Zorder를 정할 것인지, 그 노드에서 Zorder를 정할 것인지를 세팅할 수 있습니다.

* Sprite vs SpriteBatchNode
2.2 버전에서는 Sprite를 효율적으로 처리하기 위해서, SpriteBatchNode를 사용하라고 권장 했었습니다.
3.0 버전에 올라와서는 SpriteBatchNode를 사용하지 않더라도 Sprite를 만들때 TextureID를 같게 만든다면 큰 성능 이슈는 없습니다.
만약 성능을 올리고 싶다면 SpriteBatchNode를 사용하는게 여전히 좋습니다.

5. LabelTTF / LabelBMFont / LabelAtlas 개선
Label에 대한 구현이 Label 클래스로 통합되었습니다.

6. 새로운 EventDispatcher
touch event, keyboard event, acceleration event, custom event에 대한 디스패쳐가 삭제되었습니다.
EventDispatcher로 통합되었는데, 모든 이벤트는 EventDispatcher로 처리합니다.

7. 물리엔진 개선(Physics Integration)
Box2D로 구현했던 물리엔진 기능이 Chipmunk2D로 통합, 바뀌었습니다.

정리해놓고 보니까 꽤 많은 변화가 있었지만, 2.2.6 버전도 지금까지 어떤 변화가 있었는지
그에 대한 정리가 필요해보입니다.

그 외에  OpenGL 버전 업은 어떻게 되었는지도 궁금하지만 릴리즈 노트에는 없으니
따로 찾아봐야겠습니다.

ARM에서 Ricardo Quesada 님이 발표한 내용이 있어서 공유합니다.


다음엔 OpenGL 버전과 Cocos2d-x 버전과의 상관관계를 알아봐야겠습니다.


2017년 5월 11일 목요일

OpenGL Super Bible 7th 공부해볼까...

https://doc.lagout.org/programmation/OpenGL/OpenGL%20SuperBible_%20Comprehensive%20Tutorial%20and%20Reference%20%287th%20ed.%29%20%5BSellers%2C%20Wright%20%26%20Haemel%202015-07-31%5D.pdf

영어 책이라 이해가 전혀 안되진 않겠지만 힘들게 읽을거 같은데 고민...

일단 적어놓고 공부해봐야겠다.

추가, apple 문서 쪽에 openGL ES 에 대한 문서가 있는데
https://developer.apple.com/library/content/documentation/3DDrawing/Conceptual/OpenGLES_ProgrammingGuide/Introduction/Introduction.html
같이 곁들여 보면 좋을듯.

2017년 4월 28일 금요일

Cocos2d-x 3.15 version updated

이번에 Cocos2d-x 3.15 버전 업데이트가 진행되었다고 합니다.
링크: release notes
주요 업데이트 내용은 아래와 같습니다.
  • full Android Studio supports: include editing, compiling and debugging c++ codes: doc
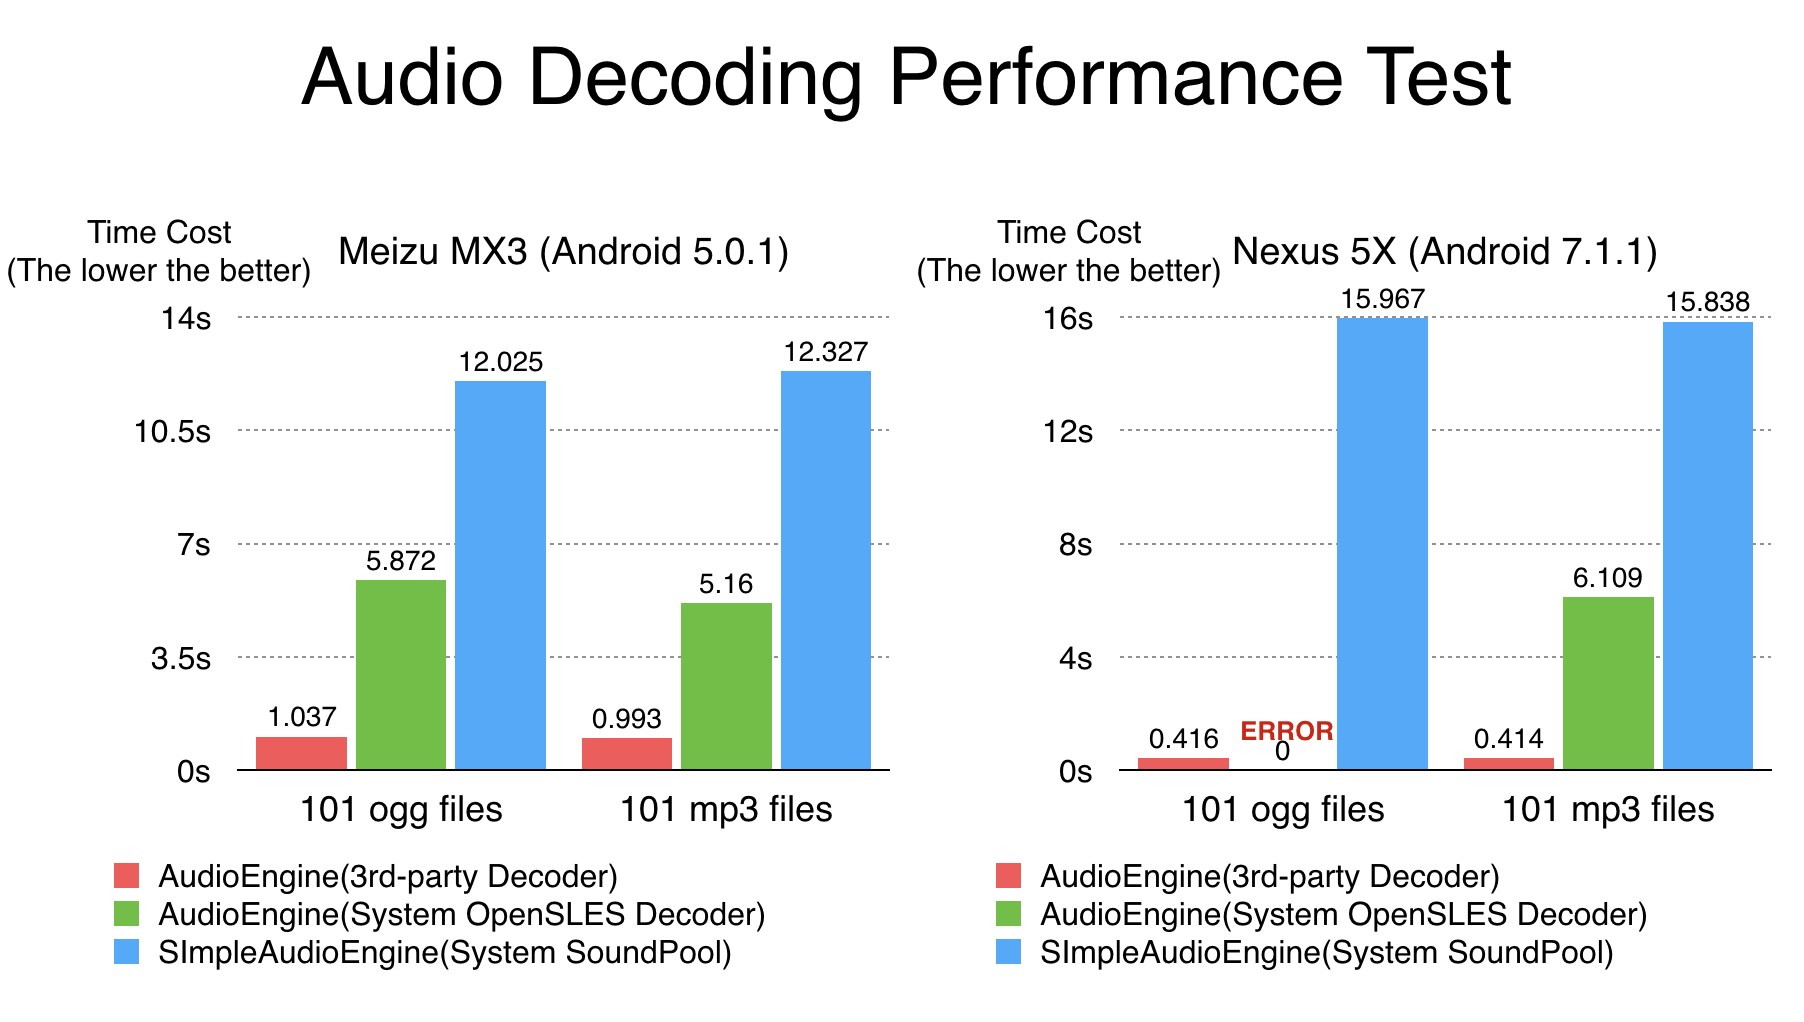
  • audio engine uses tremolo and MP3 Decoder Library to decode audio files on Android: high performance and more adaptable to different Android devices
  • WebSockets and SocketIO supports SSL
  • AssetsManagerEx is more stable
  • update Spine runtime to v3.5.35
  • update flatbuffer to v1.5
  • remove support for Windows 8.1 store and phone
  • update OpenSSL to v1.1.0
  • remove linux 32-bit support
가장 큰 변화로는 안드로이드 스튜디오를 정식으로 지원하는 점입니다.
Xcode로 개발할 경우에는 C++ 디버깅을 할 수 있었는데, 안드로이드 스튜디오에서는 하기 힘들었습니다.
(C++을 디버깅하기 위해서는 여러 가지 설정해야 하는 부분이 있었습니다.)
이번 업데이트를 통해서 안드로이드 스튜디오에서 C++ 코드를 디버깅할 수 있는 환경이 공식적으로 지원됩니다.
자세한 사항은 위의 doc 링크를 참조하시면 좋을 것 같습니다.
AudioEngine 쪽 성능 향상과 많은 안드로이드 디바이스 호환성을 위해 tremolo라는 mp3 디코더 라이브러리를
안드로이드 쪽에 추가했다고 합니다.
audio performanceaudio performance
그래프만 봤을 때 SimpleAudioEngine은 더 이상 쓰면 안 될 것 같은 느낌이네요.
저도 어서 업데이트를 해야겠습니다.
그 외에 웹소켓, Spine, flat buffer, openSSL 업데이트가 되었습니다.

2017년 4월 7일 금요일

2017년 3월 9일 목요일

Kite Compositor - 애니메이션과 프로토타이핑 툴


https://kiteapp.co/

sketch 앱과 보통 함께 쓰이는 것 같은데 강력한 툴인 것 같습니다.
일단 포스팅해두고 나중에 써보는걸로!


동영상 첨부하고
저는 사용해봐야겠습니다. ㅎㅎ

2017년 1월 12일 목요일

Admob banner not showing on app started issue on Android 6.0

Cocos2d-x 로 게임을 개발하던 중에 배너를 달았지만
앱 시작 시에 바로 나오지않고 1분 뒤에 새로고침될 때에 나오거나 앱이 resume 될 때 
광고가 나오는 현상이 발생했다.

모든 OS에서 그런 줄 알았는데 마시멜로우 버전 이상에서만 발생한다.

여기저기 찾아보던중

아래와 같은 코드가 자꾸 있길래 지웠는데 혹시나해서 그냥 해봤더니
처음 시작부터 광고가 잘나오기 시작한다.

adView.setBackgroundColor(Color.BLACK);
adView.setBackgroundColor(0);

...

이렇게 하니 모든 OS 버전에서 앱 시작과 동시에  광고가 잘 나온다.
어쨌든 해결.

JIRA Plugin - ScriptRunner 소개 #2

관련 글 소개 #1:  https://pineoc.blogspot.com/2019/03/scriptrunner-1.html ScriptRunner 소개 #2 지난 글에서는 Behaviours를 보았고 다음 내용인 콘솔, 리스너 등을 ...